
Choosing the wrong portable dental unit can lead to frustrating breakdowns and inefficient work. I know how crucial reliable equipment is, whether you’re in a fixed clinic or providing mobile care.
A high-quality portable dental unit needs durability, powerful suction, reliable handpieces, good lighting, an ergonomic chair, and easy maintenance to ensure effective and comfortable dental procedures anywhere.
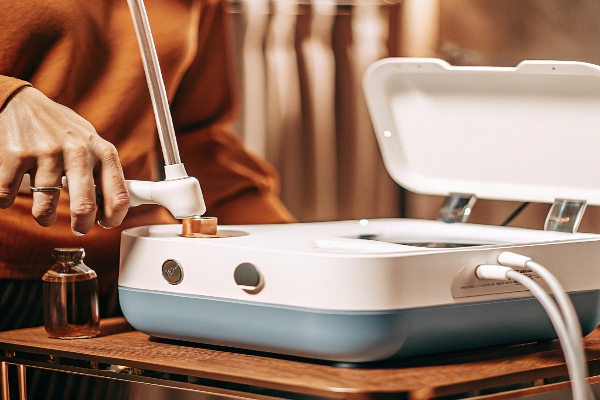
Finding the right portable unit isn’t just about ticking boxes; it’s about ensuring smooth operation and patient comfort, even outside a traditional setting. Based on my experience helping clients source reliable equipment components, I understand the importance of robust design, much like in mold making. Let’s break down exactly what features make a portable dental unit stand out, ensuring it serves you well for years to come. We need to look closely at the chair, the core components, how it all works together, and how to keep it running smoothly.
What are the features of a dental chair in a portable unit?
Using a poorly designed or uncomfortable dental chair makes long procedures tough for both you and your patient. This gets even more critical when the chair needs to be portable.
Key features for a portable dental chair include lightweight yet sturdy construction, easy foldability for transport, adjustable height and recline, comfortable padding, and durable, easy-to-clean upholstery.
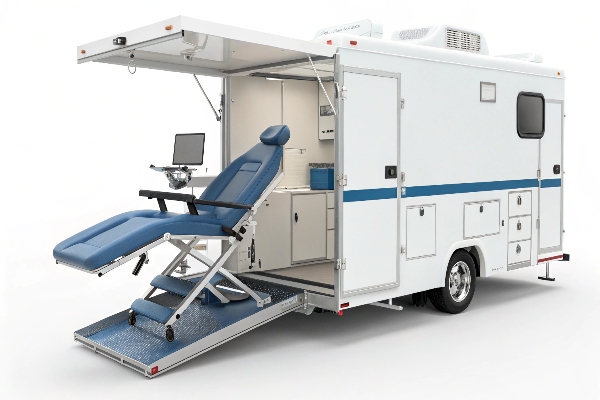
When considering a portable dental chair, think beyond basic function. It needs to be practical for transport and setup, but also provide adequate support. I remember a client who initially bought a very cheap portable unit; the chair was flimsy and uncomfortable, leading to complaints and difficulty positioning patients correctly. They quickly realized that investing a bit more in a better chair significantly improved their mobile service.
Essential Chair Characteristics for Portability and Comfort
Here’s what I recommend looking for, balancing portability with clinical needs:
- Weight and Portability: The chair must be light enough to move easily but strong enough to feel stable. Look for aluminum alloy frames. Check the folded dimensions and if it comes with a carrying case or integrated wheels.
- Adjustability: Smooth height adjustment (hydraulic or electric) and backrest recline are vital for proper patient positioning and your own ergonomics. Can the headrest be adjusted or removed?
- Comfort and Support: Even if portable, padding should be sufficient. Consider ergonomic shaping and lumbar support, especially if you perform longer treatments.
- Durability and Hygiene: The upholstery must withstand frequent cleaning with disinfectants. Seamless upholstery designs are often better as they lack crevices where debris can hide. Check the maximum weight capacity – aim for at least 135kg (300 lbs).
Here’s a quick comparison table:
| Feature | Basic Portable Chair | High-Quality Portable Chair | Why it Matters |
|---|---|---|---|
| Frame Material | Steel | Aluminum Alloy / High-Grade Steel | Lighter weight, better durability |
| Adjustability | Manual, limited range | Hydraulic/Electric, wide range | Better positioning, ergonomics |
| Padding | Thin foam | Ergonomic, multi-density foam | Patient comfort, support |
| Upholstery | Basic Vinyl | Seamless, medical-grade vinyl | Easier cleaning, longer lifespan |
| Portability | Bulky fold, separate parts | Compact fold, integrated wheels | Ease of transport and setup |
Investing in a chair with these features makes a real difference in daily use.
What are the components of a dental unit?
A portable dental unit missing key components or having low-quality parts will seriously hinder your ability to perform procedures effectively. It’s like trying to make a precision mold with incomplete tooling.
Essential components include a delivery system (with handpiece connections), suction (HVE and saliva ejector), air/water syringe, self-contained water bottle system, cuspidor (optional), and often an integrated light source.
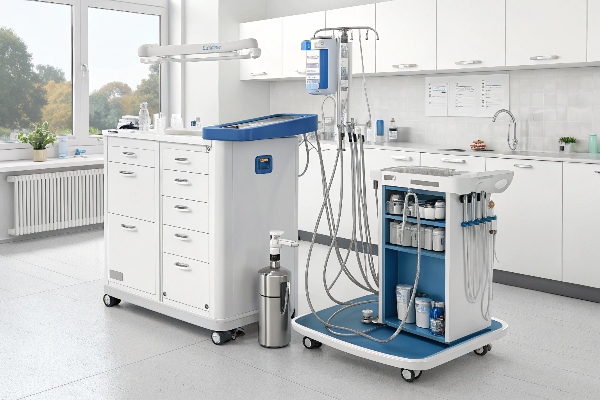
Think of the portable unit as a compact version of your standard operatory setup. Each component needs to be reliable and work seamlessly together. From my background in manufacturing and trading, I know that the quality of individual parts determines the performance of the whole system. You can’t afford failures mid-procedure when you’re working remotely.
Breaking Down the Core Components
Let’s look deeper into what makes up a functional portable dental unit:
- [Delivery System](https://www.dentalez.com/news-happenings/the-complete-guide-to-dental-delivery-systems-part-1/)[^1]: This is the heart of the unit. It needs connections for at least one high-speed and one low-speed handpiece. Look for standard 4-hole (Midwest) or 2-hole (Borden) connectors depending on your handpieces. Check the quality of the tubing and connectors – they face wear and tear. Some units have integrated ultrasonic scalers or curing lights, which adds convenience.
- [Suction System](https://www.ancar-online.com/en/blog/dental-suction-systems-what-you-should-know-before-buying/)[^2]: Effective suction is non-negotiable. A good unit will have both a High Volume Evacuator (HVE) and a Saliva Ejector. Pay attention to the suction power (often measured in L/min or kPa). Is the waste collection system easy to manage and clean? Some use disposable bags, others have collection canisters.
- Air/Water Syringe: A 3-way syringe (air, water, spray) is standard. Check for ergonomic design and reliable valve operation.
- Water Supply: Most portable units use a self-contained clean water bottle system. This is crucial for infection control. Check the bottle capacity and how easy it is to refill and disinfect. Ensure the system provides adequate, consistent water flow to handpieces and the syringe.
- [Air Source](https://up.codes/s/source-of-dental-air-compressor-intake)[^3]: Units typically have a built-in oil-free air compressor. Key specs are the airflow rate (L/min) and pressure (PSI/Bar) – it must be sufficient to power your handpieces. Noise level (dB) is also important for patient and operator comfort. Oil-free compressors are preferred for cleaner air and less maintenance.
- Control Panel & Foot Pedal: How are the handpieces, suction, and water activated? Look for intuitive controls and a robust foot pedal. Wireless foot pedals can reduce clutter.
- Optional Components: Some units include integrated LED operating lights, cuspidors (spittoons), or scaler units. Consider if these are necessary for your typical procedures.
[^1]: Explore this link to understand the essential components and features of a dental delivery system for better functionality.
[^2]: This resource provides insights into the workings and importance of suction systems in dental units, ensuring effective procedures.
[^3]: Learn about the specifications and importance of air sources in dental units to ensure optimal performance and patient comfort.
[1]: Explore this link to understand the essential components and features of a dental delivery system for better functionality.
[2]: This resource provides insights into the workings and importance of suction systems in dental units, ensuring effective procedures.
[3]: Learn about the specifications and importance of air sources in dental units to ensure optimal performance and patient comfort.
The integration and quality of these parts determine the unit’s overall performance and reliability. Don’t skimp on these core elements.
How does a portable dental unit work?
Understanding how these units operate seems complex, but it’s often simpler than expected, designed for quick setup and use. Still, lack of clarity can make potential users hesitant.
A portable dental unit integrates a compressor, suction pump, water reservoir, and instrument controls into a compact case. It powers handpieces and suction using electricity, controlled via foot pedal/switches.
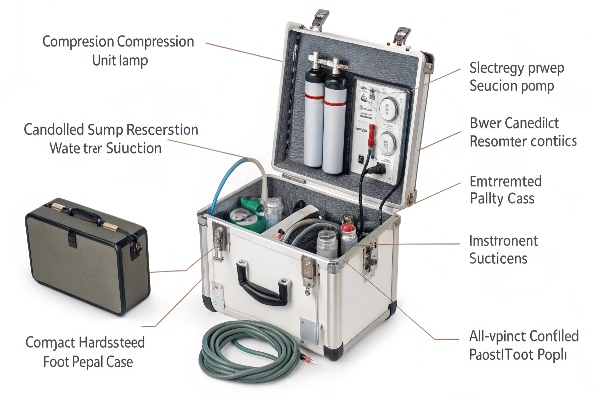
Think of it like a miniaturized, self-contained operatory. I’ve seen technicians quickly set these up in diverse locations, from schools to remote clinics. The key is the clever integration of essential systems into one manageable package. It requires some understanding, but it’s designed for efficiency.
The Workflow of a Portable Dental Unit
Let’s trace the path from setup to operation:
- Setup: The unit is typically housed in a wheeled case. Open the case, connect the power cord, and attach necessary peripherals like the foot pedal and potentially an external light if not integrated. Attach your handpieces to the designated tubing. Fill the clean water bottle.
- Power On: Switch the unit on. You’ll hear the internal air compressor start up and pressurize the system (usually indicated by a pressure gauge). The suction motor will also be ready.
- Selecting Instruments: Use the control panel or switches to select the instrument you want to use (e.g., high-speed handpiece, syringe).
- Operation: Use the foot pedal to activate the selected handpiece. Air pressure drives the turbine (high-speed) or motor (low-speed), and water coolant flows as needed. Simultaneously, the suction system (HVE or saliva ejector) removes fluids and debris from the patient’s mouth. The air/water syringe functions on demand via buttons on the syringe itself.
- Waste Management: Waste fluids and debris are drawn into a collection canister or bag within the unit. This needs to be monitored and emptied regularly according to hygiene protocols.
- Shutdown & Pack-up: After use, purge the lines, disconnect handpieces for sterilization, empty the waste container, drain the water bottle, and pack the unit back into its case.
Essentially, the unit provides compressed air, clean water, and suction—the fundamental requirements for most dental procedures—all from a single, transportable box. The efficiency comes from the compact, oil-free compressor and powerful suction pump designed specifically for this mobile application.
How do you maintain a dental unit?
Neglecting maintenance on any dental equipment, especially a portable unit that gets moved around, is asking for trouble and expensive downtime. It’s like running a CNC machine without regular checks – performance degrades, and failures happen.
Regular maintenance involves daily surface disinfection, weekly flushing of water lines, checking/cleaning suction filters, lubricating handpieces per manufacturer instructions, and periodic inspection of hoses and electrical connections.
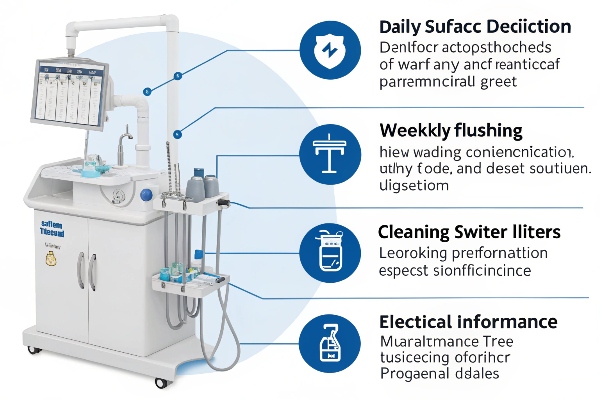
Consistent maintenance is absolutely key to keeping a portable dental unit reliable and safe. Because these units contain integrated compressors and suction systems, paying attention to their specific needs is vital. I always stress to my clients that preventative maintenance saves money and headaches in the long run, just like with industrial machinery or molds.
Key Maintenance Procedures for Longevity
Here’s a practical maintenance schedule breakdown:
-
After Each Use:
- Wipe down all external surfaces, hoses, and control panels with an appropriate intermediate-level disinfectant.
- Flush water lines briefly (usually a purge function).
- Remove, clean, and sterilize handpieces according to manufacturer guidelines.
- Clean and disinfect the air/water syringe tip (or use disposable tips).
- Empty and clean the waste collection container.
-
Daily (End of Day):
- Flush water lines thoroughly with water. Some protocols recommend flushing with a specialized cleaner (e.g., distilled water with a cleaning tablet) – follow manufacturer advice.
- Clean or replace suction filters/traps as needed. Clogged filters drastically reduce suction power.
- Wipe down the entire unit again.
-
Weekly:
- Perform a more thorough water line disinfection procedure if recommended by the manufacturer (often involving leaving a cleaning solution in the lines for a set time).
- Inspect all tubing and wiring for kinks, cracks, or wear.
- Check the compressor’s air intake filter (if accessible) and clean or replace it if necessary.
- Test all functions – handpiece operation, suction power, syringe function.
-
Periodic/As Needed:
- Handpiece lubrication (frequency depends on use and handpiece type – always follow the specific instructions).
- Professional servicing as recommended by the manufacturer (e.g., annual check-up, compressor service).
- Check seals and O-rings on water bottles and connectors.
Maintenance Tracking Table Example:
| Task | Frequency | Last Done | Notes |
|---|---|---|---|
| Surface Disinfection | After Each Use | — | Use approved disinfectant |
| Water Line Flush (Brief) | After Each Use | — | Purge function |
| Handpiece Sterilization | After Each Use | — | Follow autoclave guidelines |
| Waste Container Empty/Clean | After Each Use | — | Dispose according to biohazard protocols |
| Water Line Flush (Thorough) | Daily | [Date] | Check manufacturer recommendation |
| Suction Filter Clean/Check | Daily | [Date] | Critical for suction performance |
| Tubing/Wiring Inspection | Weekly | [Date] | Look for damage |
| Compressor Air Filter Check | Weekly/Monthly | [Date] | If accessible |
| Handpiece Lubrication | Per Use/Mfg | [Date] | Follow specific handpiece instructions |
| Professional Service | Annually/Mfg | [Date] | Essential for compressor/internal parts |
Sticking to a routine like this will significantly extend the life of your portable unit and prevent unexpected failures during patient treatment.
Conclusion
Selecting a high-quality portable dental unit means focusing on durable construction, essential components like reliable suction and handpiece operation, user-friendly design, and committing to regular maintenance for lasting performance.